While not in the baking queue, this easy to make bread was irresistible.
Zeppoles! My deep fryer was delivered so this delicious Italian treat is closer to reality. Recipe thanks to Eat, Live, Escape. https://eatliveescape.com
I retrieved my deep fryer from storage planning to make some jelly donuts. Well, I did and they were a total disaster. I faithfully followed the recipe, which apparently was deeply flawed and a deeply dejected baker binned the result.
To make myself feel better I made beignets which were fantastic. That pulled me half way out of the well of despair. This morning I made glazed donuts (all of which were on my baking bucket list) and I finally gasped the clear cool air of success.
I also had a half recipe of beignets, the dough of which I stored in the refrigerator overnight to see if they can be made a few at a time for a day or two. They were just as good today.
(Revisiting jelly donuts next time the fryer rears its ugly head.)
Glazed Donuts
INGREDIENTS • 2¼ teaspoons instant yeast (not active dry yeast) • ¾ cup warm water • ⅓ cup sugar • ½ teaspoon salt • ¼ cup unsalted butter (softened) • 1 egg • 1 egg yolk • 1 teaspoon vanilla extract • 2½ to 3 cups all-purpose flour • Vegetable oil (for frying) Glaze • 2 cups powdered sugar • ¼ cup milk • 1½ teaspoon vanilla extract
METHOD
In the bowl of a stand mixer, add yeast 1 Tbl (of the ⅓ cup of sugar,) and warm water. Let stand for 10 minutes. Add sugar, salt, unsalted butter, egg, egg yolk and vanilla extract. Attach the flat beater and mix on low speed to combine.
Switch to the dough hook and add 2½ cups flour, half a cup at a time while the stand mixer is on low speed. Knead on low until the dough starts to form. If the dough is still very sticky add more flour, 1 tablespoon at a time until the dough pulls away from the sides of the bowl. The dough should be somewhat tacky, but not sticky.
Transfer the dough to a lightly greased bowl and cover it tightly with plastic wrap. Make sure to place the bowl in a draft free, warm spot in your kitchen. Allow it to rise for 2 hours.
Gently press in the middle of the dough to deflate. Wrap the dough in plastic wrap and refrigerate for 6 to 8 hours, or overnight.
On a lightly floured surface, roll the dough out to about ½ inch thick. Use a 3½ – 4” round donut cutter or a large round cookie cutter to cut circles out of the dough. Use a 1” round cutter to cut out the center of the donut (donut holes). Place the cut-out donuts and donut holes on a parchment-lined baking sheet. Lightly cover with plastic wrap, and then drape a clean dry towel over the top and allow to rest for 1 hour (no more than 1 hour or the dough will start to get too yeasty).
In a large Dutch oven filled with 2 to 3 inches of vegetable oil over medium heat, bring the temperature of the oil up to 330-340°F.
Carefully place the donuts into the hot oil and allow to cook on each side until golden brown. Work in batches so you don’t overcrowd the pot.
Carefully remove the cooked donuts and place them on a baking sheet lined with paper towels and a cooling rack. Repeat the steps until all of the donuts have been cooked.
Glaze
In a separate mixing bowl combine powdered sugar, milk and vanilla extract. Use a whisk to combine until no lumps remain. Carefully lower each slightly cooled donut (one at a time) into the glaze. Gently flip the donut to coat the other side. Return the donuts back to the cooling rack and allow the glaze to set, for about 10 minutes.
Tom Waits wrote: “Well, I wish I was in New Orleans, I can see it in my dreams, Arm-in-arm down Burgundy, a bottle and my friends and me.”
I wrote: “I made beignets this morning and ate nearly enough to be sick, but not enough to be sick of them. I promised myself I would give them a try after I bought my deep fryer. Why, oh why did I wait so long?“
These were spot on for Cafe du Monde beignets. QC just sort of sighed when she ate hers. One of my Neighborhood QC Cadre said: “Oh my!!!! Unimaginably delicious.”
Beignets
INGREDIENTS • 3/4 c warm water between 110⁰F • 100 g (1/2 c) granulated sugar • 2 1/4 teaspoons active dry yeast (1 envelope) • 1 large egg room temperature • 120ml (1/2 c) room temperature milk • 10 ml (2 tsp) vanilla extract • 450 g (3 3/4 c) All Purpose flour • 1 tsp salt • 42 g (3 Tbl) room temperature unsalted butter • vegetable oil for deep frying or peanut oil • 60 g (1/2 c) powdered sugar
METHOD
Add the warm water to the bowl of a stand mixer or a large bowl if making this by hand or an electric mixer. Add the yeast and half the sugar then set aside for about 5 minutes to the yeast can get to work.
Measure out 3 ¾ cups of flour and mix with the teaspoon of salt and set aside.
Once the yeast mixture is bubbly, pour in the milk, vanilla, remaining sugar, and add the egg. Whisk together then add half the flour mixture and whisk together until smooth.
Attach a dough hook then add the remaining flour and begin mixing on medium speed, once the dough comes together add the butter and keep mixing until the dough is smooth and will pull away from the bowl, about 4 minutes. This dough is enriched and sticky but if it seems too wet you can mix in an extra ¼ cup of flour.
Transfer the dough to a large, lightly oiled bowl then cover and allow to rise in a warm place for at least two hours, you can also store the dough in the refrigerator for up to 48 hours. (Dough weighs 926 g.)
Add about 3 inches of oil to a large pot fitted with a candy thermometer and place over medium-high heat. Cover a wire cooling rack with a few layers of paper towels.
Once risen, roll the dough into a ½ inch thick rectangle on a well floured surface. Cut into 2-2 ½ inch squares using a pizza cutter.
Once the oil reaches 360⁰F add the beignets 3-4 at a time; fry until the bottom is puffed and golden ( 1 – 1½ minutes,) flip over and remove with a spider or slotted spoon once the bottom is golden too.
Place onto the paper towels then dust with powdered sugar and enjoy!
I decided to make a white cake this morning, until I saw this recipe for crusty Italian bread in my files. Didn’t need no stinkin’ cake anyway, This bread is very easy to make and doesn’t use any special flour (like bread flour.) If you have yeast in your cupboard (and who doesn’t) and about two hours (15 min hands on) you should be ready to go!
Crusty Italian Bread
INGREDIENTS • 314 g (1⅓ cups) warm water • 7 g (2¼ tsp) yeast • 16 g (1 Tbl) brown sugar • 12 g (2 tsp) salt • 21 g (1½ tsp) olive oil • 500 g (4 c) AP flour • 1 egg for wash
METHOD
Combine warm water, yeast, and brown sugar in a stand mixer bowl, stir and let stand ~8-10 minutes until it begins activate
Add olive oil and salt, mix well.
Gradually add the flour until the sides and bottom of the bowl come clean.
Knead using the dough hook to knead for 8 minutes.
Cover the dough and let rise until doubled, ~30 minutes. (I use a proofing oven that was warmed to temperature, then turned off.)
Punch it down, form into an oval and shape it into a loaf. Tuck ends under.
Cover the loaf with a damp cloth and let it rise (in the still warm oven) until doubled. ~20 min. Over-proofing will cause the loaves to flatten.
Preheat oven to 375ᵒF degrees.
Brush top of loaf with an egg wash (1 egg and 1 tablespoon water)
Score with a single, quick, long cut down the center.
Pour 1 cup of hot water in a shallow pan on the rack underneath the bread in the oven.
Bake for 25-30 minutes (internal temp reaches 190ᵒF) or until the loaf turn golden brown and produces a hollow sound when tapped.
For some unknown reason, or a moment of weakness, QC and I volunteered to help our community’s wine club with their July wine tasting event. Even worse, I offered to make brownies to pair with the dessert wine for each of the 168 attendees.
For practice (I always practice) I made an 11”x15” pan of brownies and cut them into one inch squares. (Do the math.)
To make them s’moresy I piped some Italian meringue on top, browned some with a blowtorch and topped some with a raspberry. The raspberry isn’t very s’moresy, but I like raspberries.
CHOCOLATE AND RASPBERRY BROWNIE BARS
INGREDIENTS
BROWNIES • 4 large eggs • 1 ¼ cups dark cocoa • 1 teaspoon salt • 1 teaspoon baking powder • 2 teaspoons vanilla extract • 2 ¼ cups sugar 1 cup • 1 cup unsalted butter, melted • 1 ½ cups All-Purpose Flour • 1 cup chocolate chips • 1 cup Raspberry Jammy Bits • 3 Tbl seedless raspberry jam • 1 tablespoon water ½ Tbl water CHOCOLATE GANACHE GLAZE • ½ cup heavy cream • ½tablespoons light corn syrup (20g) • 1 1/3 cups (200 g)) semisweet or bittersweet chocolate, chopped • ½ tablespoon vanilla extract
METHOD
Preheat the oven to 350°F. Lightly grease a 11″ x 15″ pan. To make very even bars, line the pan with aluminum foil before baking, leaving foil sticking up above the edges of the pan.
Crack the eggs into a bowl, and beat them with the cocoa, salt, baking powder, and vanilla until smooth.
Add the sugar and melted butter, stirring until smooth.
Add the flour, chips, and Jammy Bits, again stirring well. The batter will be very thick.
Spoon the batter into the prepared pan and smooth.
Bake the brownies for about 30 minutes, until a cake tester inserted into the center comes out clean (205 degrees,) or with just a few moist crumbs clinging to it. The brownies should feel set on the edges, and the center should look moist, but not uncooked. Do not over bake! Remove them from the oven.
Heat the seedless raspberry jam with the water and stir until smooth. (I use 2 tsp of apply jelly, mixed with 1 tsp water and heated to melt the jelly.) Brush over the warm brownies. Set aside to cool for an hour or longer before topping with the ganache.
To make the ganache, heat the cream and corn syrup until they begin to steam. Pour over the chopped chocolate in a bowl. Let sit for 5 minutes, add any flavorings, and whisk until smooth. Let cool for 15 minutes or so.
Pour ganache over the brownies while it’s still warm but has begun to thicken — reheat if it thickens too much as you work. Allow several hours for the ganache to set up fully. You may refrigerate the brownies to hasten the setting of the ganache.
Remove the brownies from the pan using the aluminum foil sling. Heat a knife in hot water, wipe dry and use to cut the brownies. Repeat with each cut.
Just before serving, garnish brownies with fresh raspberries and confectioners’ sugar, if desired.
ITALIAN MERINGUE
INGREDIENTS • 3 egg whites room temperature • 2/3 cup caster sugar • 1/4 cup water • 1/4 teaspoon cream of tartar
METHOD
Wipe down all tools with white vinegar.
Place sugar and water mixture over medium heat for 5 minutes. Do not stir it at all during this time. The mixture will look cloudy.
Gently stir the mixture for 1 minute. There should be little to no granules of sugar left at this point.
Once the mixture begins to bubble from the bottom, 3 to 5 minutes, place the digital thermometer in the pot and increase to medium-high heat. Do not stir it at all after this.
In the bowl of an electric mixer, whip the eggs whites on low speed until foamy. Add the cream of tartar, increase the speed to medium, and beat until soft peaks form.
Allow the sugar mixture to come to a boil and watch carefully. Once it reaches 230 °F turn stand mixer on highest speed to whip egg whites to peaks.
Once the sugar syrup reaches 240 °F, remove from heat and remove the probe. This takes about 4- 6 minutes. Allow the boiling to come to a slow bubble before moving on.
Slowly pour sugar syrup (steady stream) into whisked egg whites. Avoid the whisk attachment or it will fling your mixture all over the bowl.
Allow mixture to whisk for another 3-5 minutes until the mixer bowl is cool/room temperature to the touch..
Storing and Make Ahead Information:
Italian Meringue can be made ahead of time and stored in a piping bag or covered bowl, in the refrigerator covered for up to five days or at room temperature covered for up to three days.
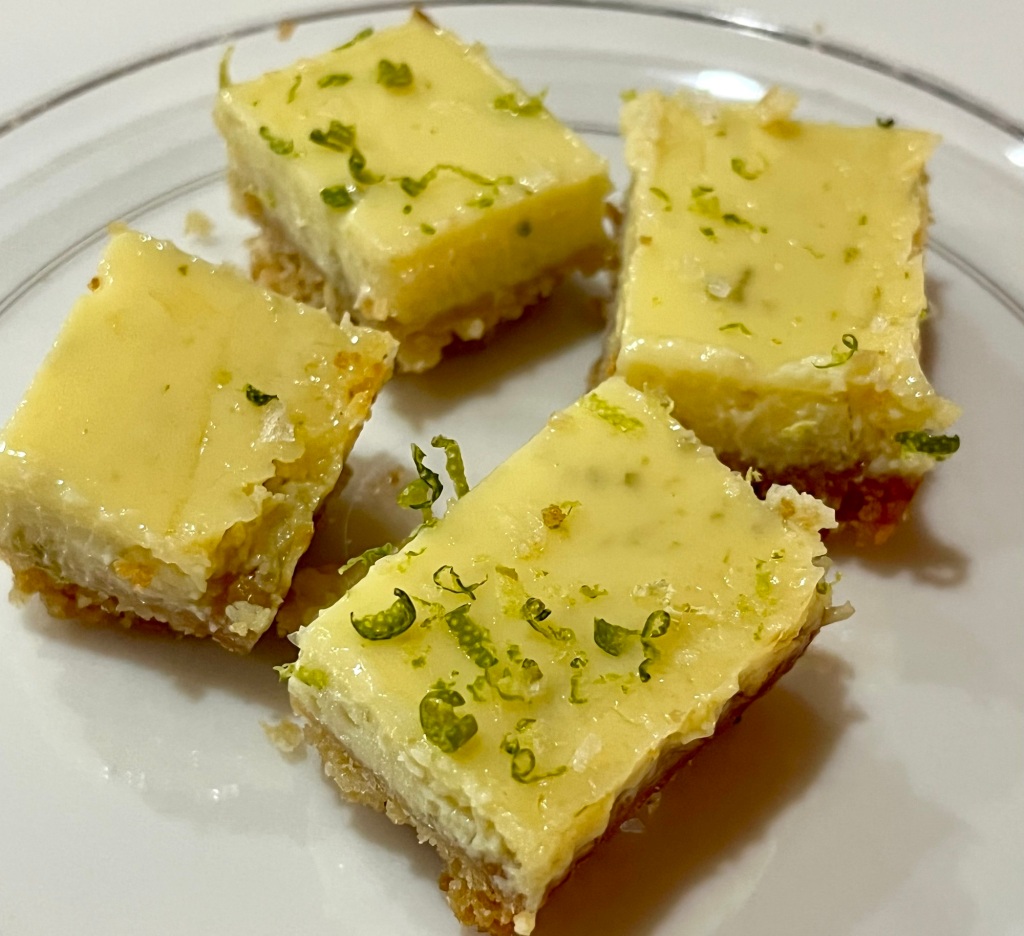
I saw these somewhere and had to make them. Good tart and tasty after golf bake. Maybe use a graham cracker base next time.
Salted Margarita Bars
INGREDIENTS CRUST • ½ cup/113 grams unsalted butter (1 stick), melted, plus more for greasing the pan • About 40 saltine crackers (from one 4-ounce/113-gram sleeve) • 1 tablespoon granulated sugar • 1 teaspoon kosher salt FILLING • 2 teaspoons lime zest plus ½ cup juice (from about 4 limes) • ¼ cup tequila (preferably blanco) • 2 tablespoons orange liqueur, such as Grand Marnier • Pinch of kosher salt • 5 large egg yolks • 1 (14-ounce) can sweetened condensed milk • Flaky salt, for finishing
METHOD
Heat the oven to 350 degrees. Lightly grease a 9-inch square baking pan with butter. Line the buttered pan with parchment, leaving an overhang on two sides to help pull the bars out of the pan.
CRUST: In a food processor, pulse the saltines until ground like coarse sand. It’s OK if there are a few larger pieces. Add the melted butter, sugar and salt, and pulse a few more times until all the crumbs are evenly saturated. Pour the mixture into the lined pan, press into an even layer and freeze for about 15 minutes.
After the crust has chilled, bake it until fragrant and golden brown, about 15 to 18 minutes.
FILLING: As the crust is chilling, in a liquid measuring cup or small bowl, combine the lime zest, lime juice, tequila, orange liqueur and salt.
In a medium bowl whisk together the yolks and sweetened condensed milk. Add the tequila-lime mixture to the yolk mixture, whisk to combine, then pour into the prepared crust. (It’s OK if the crust is not yet completely cool.) You may be tempted to prepare the curd earlier, but don’t do so more than 10 minutes before baking, as the lime juice will start to thicken it, which could affect the bake.
Bake 15 to 17 minutes until the curd is set around the edges and slightly jiggly in the center.
Transfer to a rack to cool slightly, then freeze for at least 2 hours.
After freezing, remove the bars from the pan using the parchment paper overhang and transfer to a cutting board. Sprinkle with flaky salt, cut into 16 bars and serve right away. Store leftovers in the freezer. Cheers!
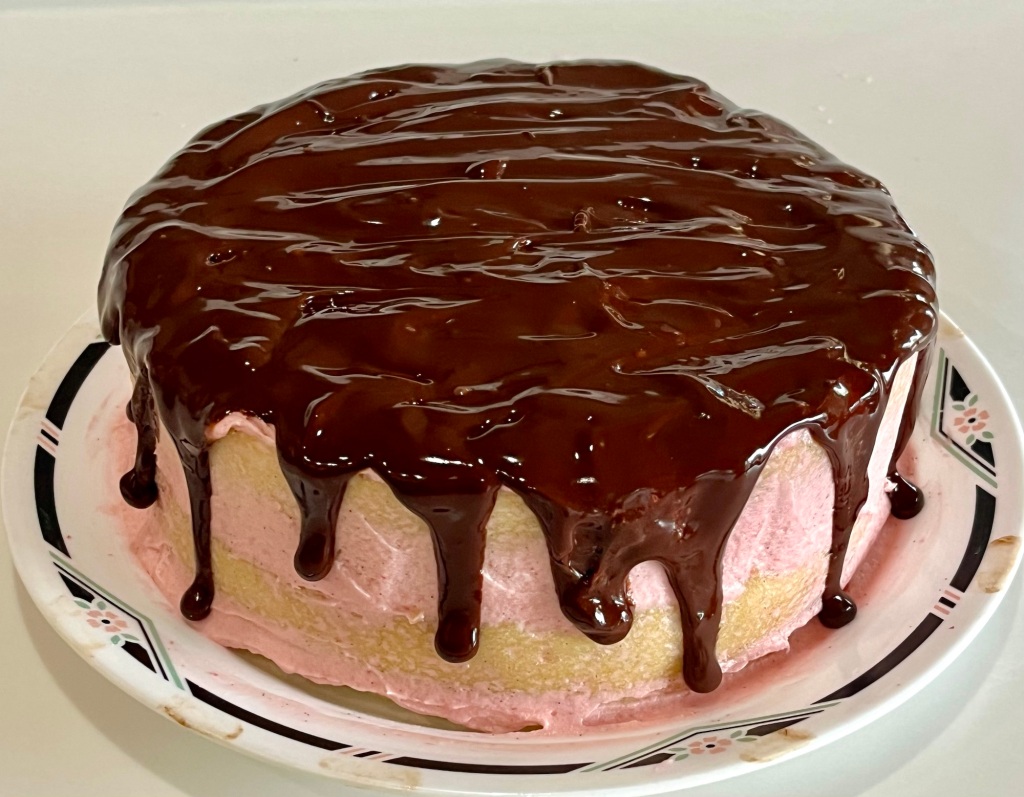
Last week I made a two layer vanilla sheet cake with raspberry mousse filling. It was moist and delicious… but I wanted a more tender crumb… so today I made a practice nearly-naked vanilla cake with raspberry buttercream. (Nearly naked – as it wasn’t heavily frosted and some cake was visible.) For a little contrast I added a dark chocolate ganache drip.
I believe I made one mistake with this cake. After baking I refrigerated the cake for a couple of hours as I ran errands. I feel the cake was more tender before chilling. Next time, I will frost the cake as soon as it cools to room temperature.
Vanilla Cake Recipe
INGREDIENTS • 2½ cups all-purpose flour (280g) • 2¼ tsp baking powder • ¾ tsp salt • 1⅔ cups granulated sugar (333g) • ¾ cup unsalted butter room temperature (170g) • 3 large eggs room temperature • 1 Tbsp vanilla (15mL) • 1 cup buttermilk (240mL) METHOD
Preheat oven to 350F and line two 8-inch pans with parchment paper and butter the sides. Sift the flour, baking powder, and salt into a bowl, then whisk together and set aside.
Cream the butter in a stand mixer fitted with a whisk attachment or an electric hand mixer. Add the sugar and beat on high for 3-4 minutes, scraping the bowl down as needed. Add the vanilla, then eggs one at a time while mixing on medium speed, then scrape the bowl down and mix in high for a minute.
Reduce speed to low and add the flour in three batches alternating with the buttermilk. Once almost combined, remove the whisk attachment and fold in any remaining butter/flour using a spatula. Do not over-mix the batter.
Divide batter equally between the two pans, then bake at 350F for 30-40 minutes or until the edges pull away from the pan, and a toothpick inserted in the center comes out clean.
Allow to cool in pan for about two minutes, then invert cake pan onto a cooling rack. After 10 minutes remove pan from layers, remove the paper, and set aside to cool completely.
Raspberry Buttercream Frosting
INGREDIENTS • 226 g (1 c) of powdered sugar (or 1/2 box) • 1/2 c (1 stick) of softened butter • 1-2 tsp of vanilla • ~1 Tbl whipping cream (for crumb coat frosting as needed)
Optional • 2 Tbl Meringue Powder to make crusting frosting. • 12 oz fresh raspberries • 1 Tbl Raspberry Freeze Dried Powder • Red food coloring METHOD
Add powdered sugar to mixing bowl.
Add softened sticks of butter
Add vanilla. If you want white frosting add a very small amount of violet food coloring
Add 1 tbsp of cream.
Beat on low until powdered sugar is incorporated. Then move mixer up to medium-high speed. Scrape sides and bottom of bowl often. When completely mixed the frosting may appear dry. (See option below.)
Add more cream, a little bit at a time, beating at slowest speed, until frosting is the proper consistency.
For optional raspberry flavor
Add raspberries and 2 Tbl sugar to a food processor and pulse to macerate the berries
Sieve to remove pulp and seeds. You should have about ½ cup puree.
Add puree to soft peak mixture and red food coloring if desired.
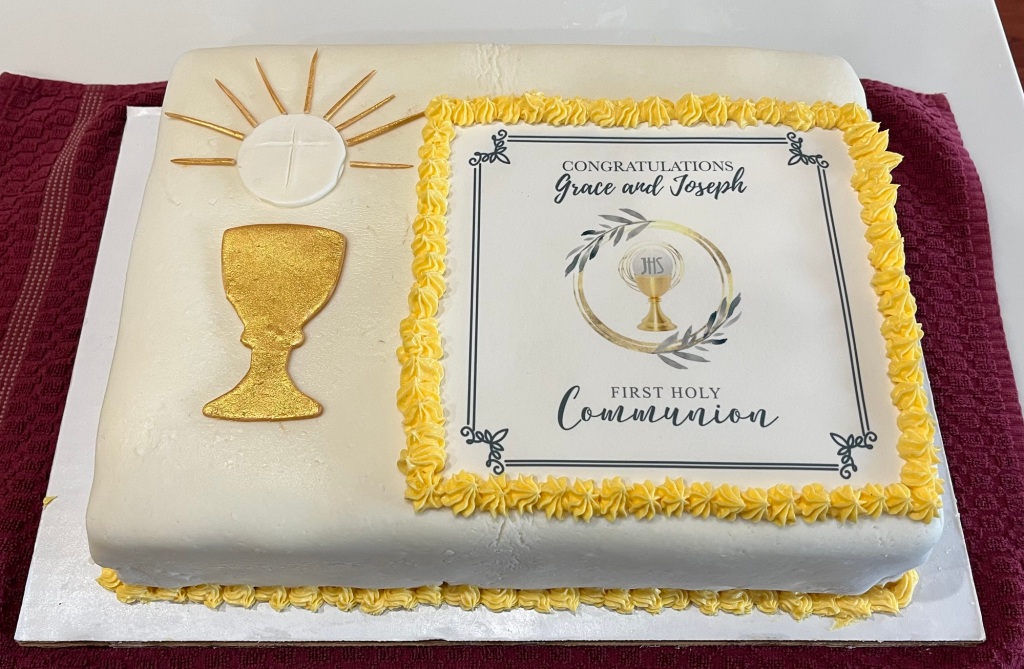
Last week I was asked to make some (~6-7 dozen) dessert pastries for our temples gala fundraiser, This week I made the First Holy Communion cake for our granddaughter Grace, and her cousin Joe. What fun!
This cake is the second time I made a cake for 60 people. It is a two layer cake with fresh raspberry mousse filling, as requested by Grace. It took me 5 attempts to develop the mousse that fulfilled my requirements of fresh taste but firm enough to be a cake filling, without being too dense. Oddly, it also took me 5 attempts to perfect the chalice and the circular disk which represents the Eucharist. I ended up with simple fondant cut outs. The chalice was sprayed with edible gold glitter. A cross was impressed on the disk with a fondant tool. The sun rays were fondant cut at a thin taper with a pizza cutter, then dried.
The vanilla cake (as requested) is two 3” layers, each 11×15”. They were crumb coated with basic buttercream. I built a dam to hold the mousse b adding some meringue powder to a portion of the buttercream and piped it around the edge of the lower cake layer. Another portion of the buttercream was dyed in an attempt to color it gold. A few drops of yellow and one of orange was the prescribed ratio. I would have added a very small amount of brown, if I had the courage. To add very small amounts, just dip the end of a toothpick in the food dye and wipe it through the buttercream, then beat.
The fondant is basic marshmallow fondant, but a lot of it. I needed it to be 16×25” to cover the cake. One issue I had was the fondant was drying out as I kneaded and rolled it out. (Next time, don’t make it 2 days in advance.)
Yellow Sheet Cake (2 required)
YIELD: SERVES 25-30 INGREDIENTS
• 570 g all-purpose flour (spoon & leveled) • 2tsp baking soda • 1 tsp salt • 460 g unsalted butter, softened to room temperature • 700 g granulated sugar • 4 large eggs, at room temperature • 4 tsp pure vanilla extract • 240 g (1 c) sour cream, at room temperature • 480 ml (2 c) whole milk, at room temperature METHOD
Preheat oven to 350°F (177°C). Generously grease and lightly flour a 11x15x3” cake pan. Set aside.
Whisk the flour, baking soda, and salt together in a large bowl. Set aside. Using a handheld or stand mixer fitted with a paddle attachment, beat the butter on high speed until smooth and creamy – about 1 minute. Add the sugar and beat on high speed for 3 full minutes until creamed together. The mixture should be a light yellow color. Scrape down the sides and up the bottom of the bowl with a rubber spatula as needed. On medium-high speed, add 1 egg at a time, beating well after each addition until both are mixed in. On high speed, beat in the vanilla extract and sour cream. Scrape down the sides and up the bottom of the bowl with a rubber spatula as needed.
With the mixer running on low speed, add the dry ingredients to the wet ingredients alternating with the milk. Start and end with the dry ingredients. Mix each addition just until incorporated. Do not overmix this batter. The batter will be smooth, velvety, and slightly thick.
The full recipe yields 2000g of batter. Spread the cake batter into the prepared pan. Smooth it out into a thin, even layer. Bake for 20-22 minutes (for the jelly roll pan, less for a half recipe or 45-50 minutes for a double in an 11×15” pan.) Actual times depend on pan used, less time for shallow pan, more for deeper, or until the top is lightly browned and a toothpick inserted in the center comes out clean, or 200F. (Two 8” round pans required 30 minutes to bake in my oven.) Make sure you rotate the cake pan once or twice during bake time if your oven has hot spots. Remove from the oven and allow the cake to cool in the pan placed on a wire rack. As the cake is cooling, make the frosting.
Make ahead tip: Cake can be made 1 -2 days in advance, wrapped in plastic wrapped tightly at room temperature.
I suggest freezing the wrapped cake for a couple of hours before assembling the cake. They are very tender and fragile when at room temperature and much more stable when chilled/frozen.
• 1 cup heavy whipping cream, chilled • 2 Tbl instant vanilla pudding powder (substitute corn starch if desired.) • 2-3 Tbl powdered sugar
METHOD
Combine raspberries and 2 Tbl confectioners’ sugar in a small bowl and add to a food processor and pulse until berries are reduced
Sieve the mixture allowing enough time for most of the raspberry juice to drip into a bowl, (enough to make 200ml (2/3 c) puree)
Add 1 Tbl vanilla pudding, softened cream cheese and 1/4 cup sweetener, raspberry powder and ouzo and beat until well combined (3-4 minutes on high.) Mix in red food coloring in 2 or 3 aliquots until desired color is attained.
In a large bowl, whip the heavy cream and confectioners sugar. Add red food coloring (in several small amounts until desired color is attained) and whip to firm peaks.
Add the vanilla pudding mix near the end and stir slowly. It will start setting the mousse quickly.
Fold the raspberry mixture into the whipped cream until combined. Divide the mousse among 6 dessert cups, cover, or fill a piping bag and chill until set, about 1 hour.
Marshmallow Fondant (2 required)
INGREDIENTS
• 1 package (16 ounces) white mini marshmallows • 2-5 tablespoons water • 2 pounds sifted confectioners’ sugar • 1/4 cup solid vegetable shortening
METHOD
Grease a mixing bowl and a glass bowl that can be used to melt marshmallows in the microwave.
Place the marshmallows, water and flavoring of your choice in greased glass bowl and microwave on high at 30 second intervals.
Stir every 30 seconds until marshmallows are completely melted, about 2 minutes.
Sift one half of the 2-pound bag of confectioner’s sugar in a greased mixing bowl. Make a well in the center of the confectioner’s sugar and pour in the melted marshmallows.
I use the paddle attachment for my KitchenAid mixer for this first part of the mixture.
Mix until all the melted marshmallows are incorporated in the confectioner’s sugar.
Add any food coloring at this point.
Mixture will be thick but still runny.
Sift the remaining half bag of confectioner’s sugar into the melted marshmallows.
Mix on low until it comes together.
Change to your dough hook attachment as this will get extremely thick.
Fondant will be very thick and have a dough like consistency. I like to knead by hand to assure everything is well mixed.
Wipe a thin layer of vegetable shortening over the surface and wrap the fondant in plastic to make sure no air gets to it.
Rest fondant for at least an hour before use. Store at room temperature for no more than a day.
Buttercream Frosting (May need 2-3 recipes)
INGREDIENTS
• 452 g (4 cups) of powdered sugar (or 1 box) • 1 Cup (2 sticks) of softened butter • 2-3 teaspoons of vanilla • 1-2 tablespoons of whipping cream (for crumb coat frosting add cream as needed) Optional • 2 Tbl Meringue Powder to make crusting frosting. • Violet food coloring (a very small amount will make the frosting white)
METHOD
Add powdered sugar to mixing bowl.
Add softened sticks of butter
Add vanilla. If you want white frosting add a very small amount of violet food coloring
Add 1 tbsp of cream.
Beat on low until powdered sugar is incorporated. Then move mixer up to medium-high speed. Scrape sides and bottom of bowl often. When completely mixed the frosting may appear dry.
Add more cream, a little bit at a time, beating at slowest speed, until frosting is the proper consistency.
QC asked for some pretzels for her Maj Jongg game tomorrow and after 18 holes of poorly played golf this morning, that was exactly what I needed to do.
The Soft Chewy Pretzels I make are pretty easy and only take a couple of hours.
Forgive my hubris, but these pretzels are wonderful. Definitely worth making more often,
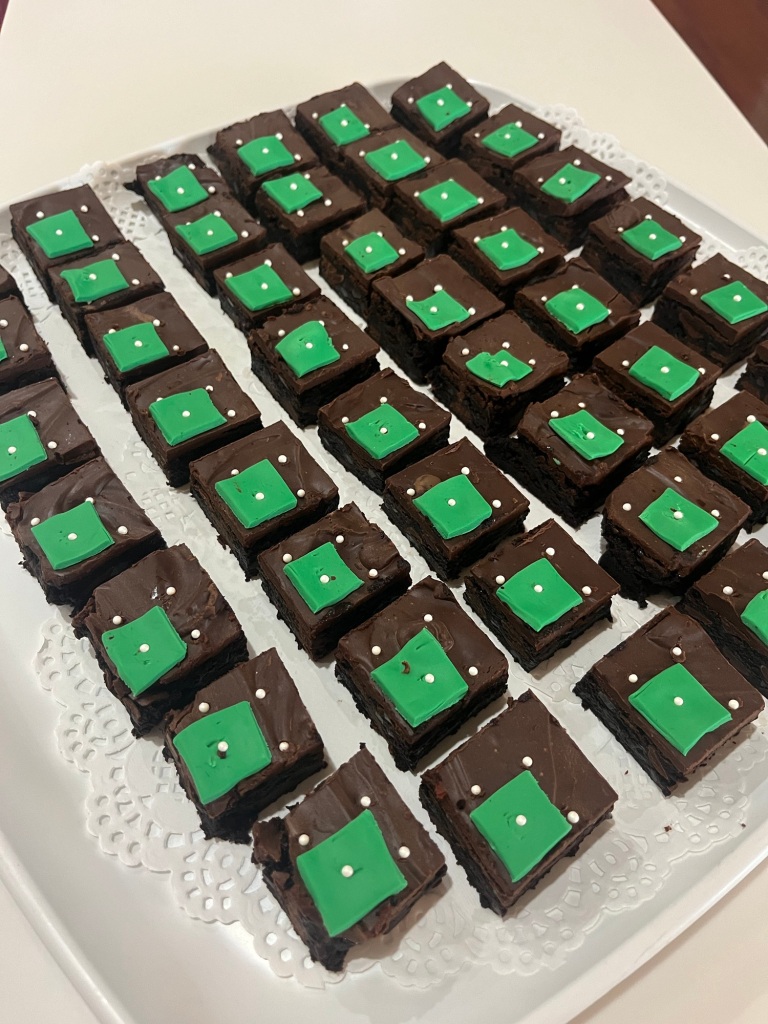
I am always pleased when asked to prepare some items for a party, large or small. Tonight is our annual temple baseball themed gala with an expected attendance of 100 people. I started this tradition in 2018, but missed a couple of years due to Covid etc.
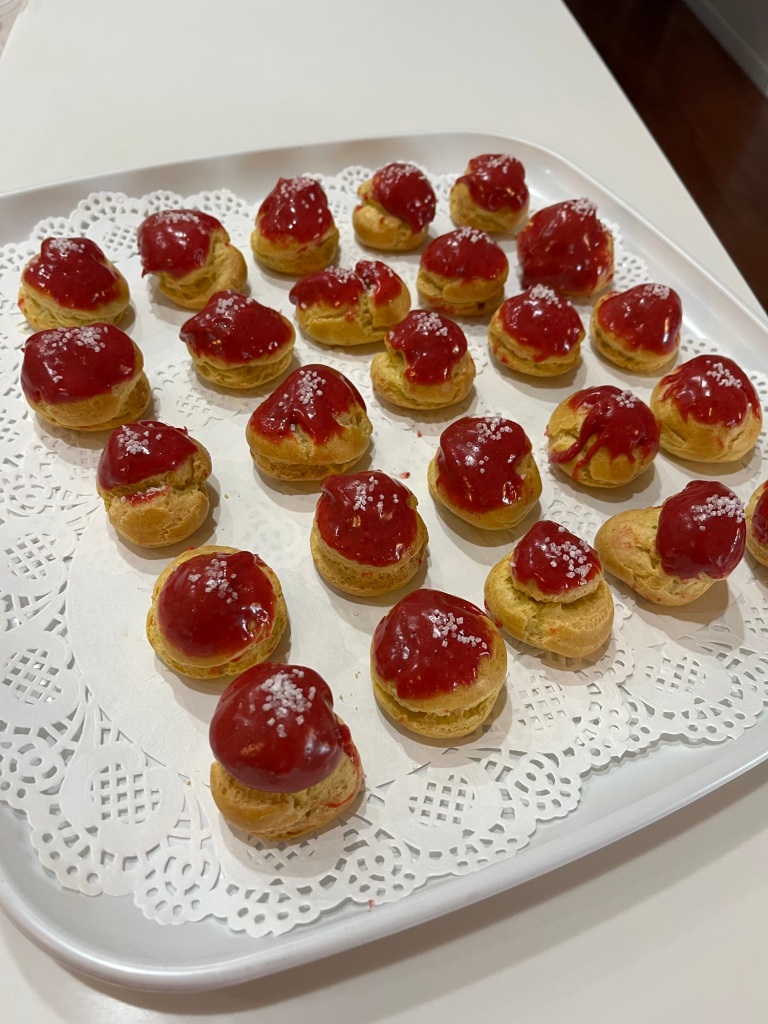
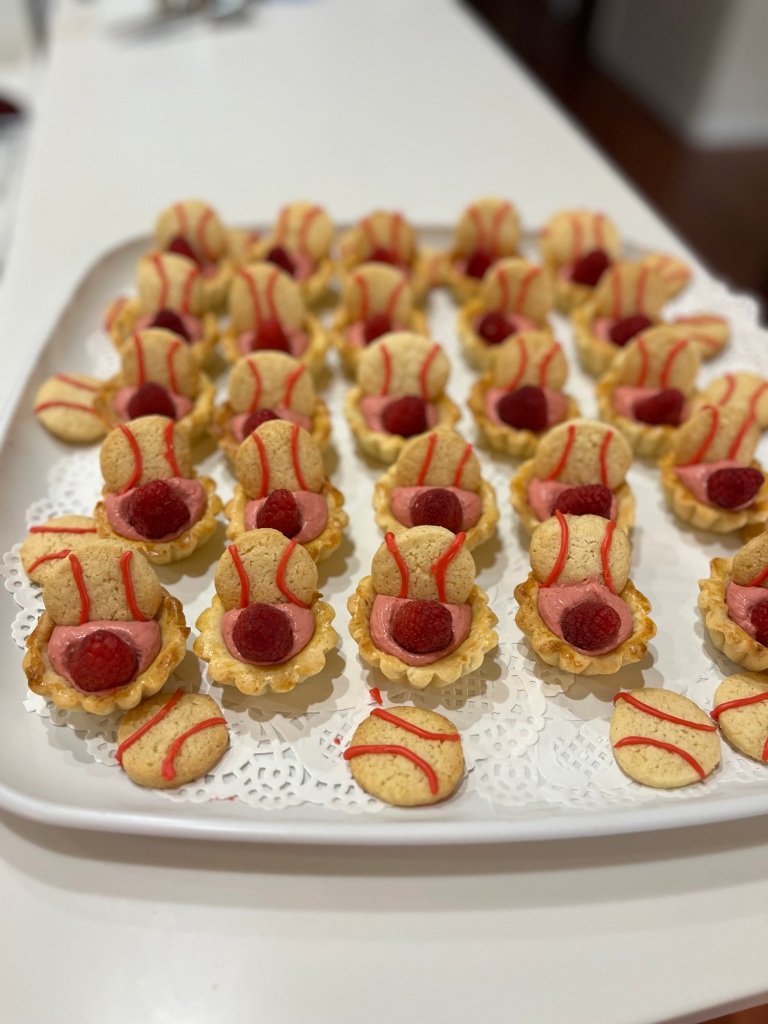
Tonight Dede’ Bakery and Confectionary is serving chocolate/raspberry baseball field brownies, gluten free raspberry mousse tarts with baseball decorated cookies and key lime profiteroles with no baseball association whatsoever. (I just like them.)
GLUTEN FREE TARTS INGREDIENTS • 100 g cold butter cut into small cubes • 60 g icing sugar • 200 g Kim’s Bread flour blend • ½ tsp vanilla • ¼ tsp salt • 2 eggs – 1 for the dough and the other 1 reserved for an egg wash
METHOD
Mix dry Ingredients.
Lightly beat egg then add the melted butter.
Add wet to dry ingredients. Form into a dough ball.
Wrap the dough ball in plastic and refrigerate for 30 minutes.
Roll to a 1/8” thick sheet between two pieces of parchment paper or plastic.
Cut rounds of the dough about an inch larger than the tart pans
Gently press the dough circles into the tart pans pressing into any flutes
Patch any breaks with extra dough
Dock the bottom of the crust. Wrap and keep in freezer at least 30 minutes.
Pre-bake the tart crust 8 to 10 minutes in preheated oven at 350 deg.
Depending on recipe, you may want to protect the crust of the tart with foil
Cool to room temperature
Fill with raspberry mousse.
Top with a raspberry and white sugar cookies with red baseball seams.
Combine raspberries and 2 Tbl confectioners’ sugar in a small bowl and add to a food processor and pulse until berries are reduced
Sieve the mixture allowing enough time for most of the raspberry juice to drip into a bowl, (enough to make 200ml (2/3 c) puree)
Add 1 Tbl vanilla pudding, softened cream cheese and 1/4 cup sweetener, raspberry powder and ouzo and beat until well combined (3-4 minutes on high.) Mix in red food coloring in 2 or 3 aliquots until desired color is attained.
In a large bowl, whip the heavy cream, vanilla pudding mix and confectioners sugar.
Add red food coloring (in several small amounts until desired color is attained) and whip to firm peaks.
Fold the raspberry mixture into the whipped cream until combined. Divide the mousse among 6 dessert cups, cover, or fill a piping bag and chill until set, about 1 hour.
KIM’S GLUTEN FREE BREAD FLOUR BLEND Yield: 700g (5 c) INGREDIENTS • 285g Bob’s Red Mill potato starch • 250g superfine white rice flour (DON’T use regular rice flour, ie Bob’s Red Mill) • 75g Tapioca flour • 75g Whey protein isolate or egg white protein. • 15g Xanthan gum METHOD
Weigh all ingredients and add to a stand mixer bowl
Mix on low, with bowl covered for 30 seconds
CHOCOLATE AND RASPBERRY BROWNIE BARS I made a 1 ½ recipe and used an 11×15 pan.
INGREDIENTS Brownies • 4 large eggs • 1 ¼ c dark cocoa • 1 tsp salt • 1 tsp baking powder • 2 tsp vanilla extract • 2 ¼ c sugar • 1 c unsalted butter, melted • 1 ½ c All-Purpose Flour • 1 c chocolate chips • 1 c Raspberry Jammy Bits • 3 Tbl seedless raspberry jam • 1 Tbl water Chocolate Ganache Glaze • 1 Tbl cup heavy cream • 1 Tbl light corn syrup (20g) • 2 ⅔ c (400g) semisweet or bittersweet chocolate, chopped • 1 Tbl vanilla extract
METHOD
Preheat the oven to 350°F. Lightly grease a 9″ x 13″ pan. To make very even bars, line the pan with aluminum foil before baking, leaving foil sticking up above the edges of the pan.
Crack the 4 eggs into a bowl, and beat them with the cocoa, salt, baking powder, and vanilla until smooth.
Add the sugar and melted butter, stirring until smooth.
Add the flour, chips, and Jammy Bits, again stirring well. The batter will be very thick.
Spoon the batter into the prepared pan and smooth.
Bake the brownies for about 30 minutes, until a cake tester inserted into the center comes out clean (205 degrees,) or with just a few moist crumbs clinging to it. The brownies should feel set on the edges, and the center should look moist, but not uncooked. Do not over bake! Remove them from the oven.
Heat the seedless raspberry jam with the water and stir until smooth. (I use 2 tsp of apple jelly, mixed with 1 tsp water and heated to melt the jelly.) Brush over the warm brownies. Set aside to cool for an hour or longer before topping with the ganache.
To make the ganache, heat the cream and corn syrup until they begin to steam. Pour over the chopped chocolate in a bowl. Let sit for 5 minutes, add any flavorings, and whisk until smooth. Let cool for 15 minutes or so.
Pour ganache over the brownies while it’s still warm but has begun to thicken — reheat if it thickens too much as you work. Allow several hours for the ganache to set up fully. You may refrigerate the brownies to hasten the setting of the ganache.
Remove the brownies from the pan using the aluminum foil sling. Heat a knife in hot water, wipe dry and use to cut the brownies. Repeat with each cut.
KEY LIME PROFITEROLES INGREDIENTS Whipped Cream Key Lime Curd: • ½ c white sugar • 2 Tbl cornstarch • ¼ tsp kosher salt • 1 large egg, plus 2 large egg yolks • 2 tsp lime zest • ⅔ c key lime juice • ⅔ c sweetened condensed milk • 2 Tbl butter • ¾ c heavy whipping
Choux Pastry: • ½ c (65 grams) AP flour • ½ tsp granulated white sugar • ¼ tsp salt • 4 tbsp (55 grams) unsalted butter, cut into pieces • ½ c (120 ml) water • 2 large eggs, lightly beaten White Chocolate Raspberry Ganache • 150 g confectioner’s sugar • 50 g heavy cream • 1 Tbl freeze-dried raspberry powder • Red food coloring • Coarse decorating sugar
METHOD
Preheat oven to 400° F (200° C) and place rack in center of oven.
In a bowl whisk the flour with the sugar and salt.
Place the butter and water in a saucepan over medium high heat and bring to a boil.
Remove from heat and, with a wooden spoon, add the flour mixture, all at once, and stir until combined. It will look like mashed potatoes. Return saucepan to the heat and stir constantly until the dough comes away from the sides of the pan and forms a thick smooth ball (about 1-2 minutes). The dough will film the bottom and sides of the saucepan and make cleaning a pain.
Transfer the dough to an electric mixer and beat on low speed to release the steam from the dough (about 1 minute).
Once the dough is lukewarm start adding the lightly beaten eggs (dough will separate and then come together) and continue to mix until you have a smooth thick paste (dough will fall from a spoon in a thick ribbon).
Place the dough in a pastry bag fitted with a large plain tip and pipe oblongs of dough (about 3/4 inch (2 cm) wide) onto the parchment lined baking sheet. (When piping hold the bag at a 45-degree angle.) If desired, with a pastry brush, gently brush the tops of the dough with the lightly beaten egg.
Bake for 15 minutes and then reduce the oven temperature to 350o F (180o C).
Remove from oven, pierce an end of each éclair with a small skewer to release the interior steam.
Continue to bake for a further 25 minutes or until the shells are a nice amber color and when split, are almost dry inside. Remove from oven and place on a wire rack to cool.
Warm white chocolate to soften (30 seconds in a 1000W microwave)
Heat whipping cream to steam, but not boil and pour over the softened white chocolate
Let sit 3-4 minutes then add freeze dried raspberry, red food coloring and beat with a spoon until the mixture is smooth
After filling the profiteroles with the key lime curd dip the top into the warm ganache and sprinkle with decoration sugar. ROYAL ICING Makes ~3 cups of royal icing, (¼ recipe decorated 48 1” diameter cookies) INGREDIENTS • 4 cups (480g) confectioners’ sugar, sifted • 3 Tablespoons meringue powder (not plain egg white powder) • 9–10 Tablespoons room temperature water METHOD
Sift confectioners’ sugar and meringue powder, into a large bowl and add 9 Tablespoons of water. Add half the water after sifting 2 cups of sugar. Add the remaining water or more, checking flow consistency of the icing is what you want for piping etc.
Using a hand mixer or a stand mixer fitted with a whisk attachment, beat icing ingredients together on high speed for 1.5 – 2 minutes.
When lifting the whisk up off the icing, the icing should drizzle down and smooth out within 5-10 seconds. If it’s too thick, beat in more water 1 Tablespoon at a time. I usually need 10 Tablespoons but on particularly dry days, I use up to 12-14 Tablespoons. Keep in mind that the longer you beat the royal icing, the thicker it becomes. If your royal icing is too thin, just keep beating it to introduce more air OR you can add more confectioners’ sugar.
When applied to cookies or confections in a thin layer, icing completely dries in about 2 hours at room temperature. If icing consistency is too thin and runny, it will take longer to dry. If the icing is applied very thick on cookies, it will also take longer to dry. If you’re layering royal icing onto cookies for specific designs and need it to set quickly, place cookies in the refrigerator to help speed it up.